

Visual Studio Code tips for monorepo development with Multi-root Workspaces and extension
Written by Damian Cyrus


This is intended for developers working with Visual Studio Code in a monorepo. I’ve already mentioned this in part as a bonus in another post, but this one goes into a bit more detail.
Requirements
There is not much to do to make Visual Studio Code work in monorepos: by default, it should work out of the box, until you install extensions. That’s not entirely true, but combined with a lack of configuration, your extension may not work well or at all. If you have problems with an extension and the configurations don’t work, try a multi-root workspace.
Multi-root Workspaces
A multi-root workspace is a feature in Visual Studio Code where you can have multiple root folders in one explorer view. This tells compatible extensions to use one folder within the required package, rather than multiple. Multi-root workspaces contain settings that work on a global level and can be overwritten with another settings.json inside its own project folder. Multi-root workspaces can contain different folders, that means they can be from anywhere on a file system. In our monorepo case, we will only use the root folder and the folders inside packages. As an example, here we have a sample monorepo folder structure:
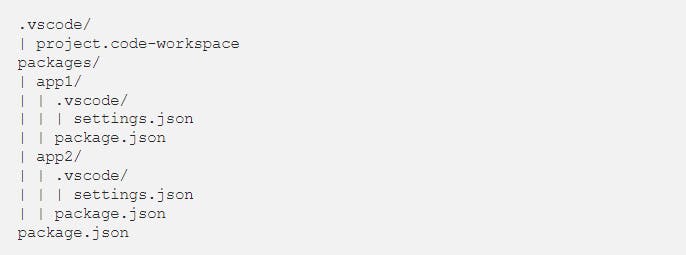
You can see a .code-workspace file for Visual Studio Code inside the root folder .vscode. Note one thing: the paths in this file can be relative or absolute, and you can place it wherever you want to make it fit your repo. I like to bundle the workspace file into the root folder .vscode because if someone uses a different editor or IDE, it will be placed where it belongs. As file name I use the project name, this is displayed in the window title of Visual Studio Code. Here is an example of the contents of the project.code-workspace file:
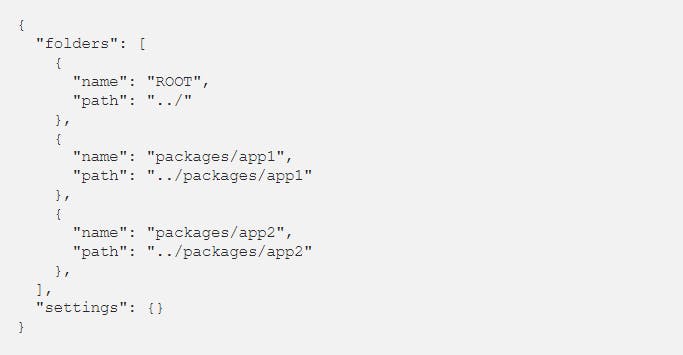
Let me explain this a little:
- folders: Displays the folders in the Explorer view as root folders. The order of these - - objects defines the order in the view.
- name: This key is optional and you can choose what you want
- path: The path to the folder you want to have as a root folder
- settings: Global settings for the workspace
Now our explorer view should look like this:
As you might have guessed, you can have multiple folders in the monorepo packages folder, but you don’t need to list them. This can help you structure only the things that you need to see and work on. If there is another app3 that is not your responsibility, then hide it by not showing it in the folders list.
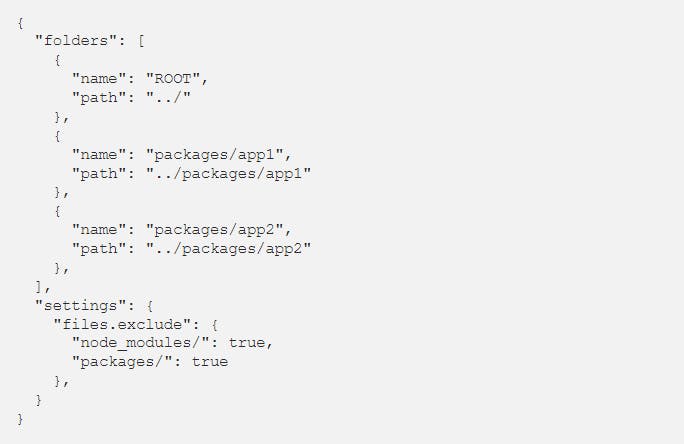
“But the other app folders are still shown by the packages in the root!” — Yes, you are right, so we change the workspace settings to fix this. Additionally, we remove the node_modules folder from view, since we don't look in there most of the time.
Now your explorer view should look like this:

Let’s see what we have in the settings part of the file. Here we use the global settings of Visual Studio Code to exclude files from the view. In this case, we hide the node_modules folder and all packages folders inside our structure (view). Nice and clean.
Next, we will see how we can use some extensions to work in monorepos.
Extensions for Visual Studio Code Extensions are helpful for developers, and the Visual Studio Code marketplace offers a lot. Extensions can be installed directly from Visual Studio Code. For monorepo supported extensions, you can look at the multi-root ready and monorepo tagged lists. As mentioned in the first tag: they are compatible with multi-root workspaces.
Extensions installation Launch Visual Studio Code Quick Open (Ctrl + P), paste the following command, and press enter:

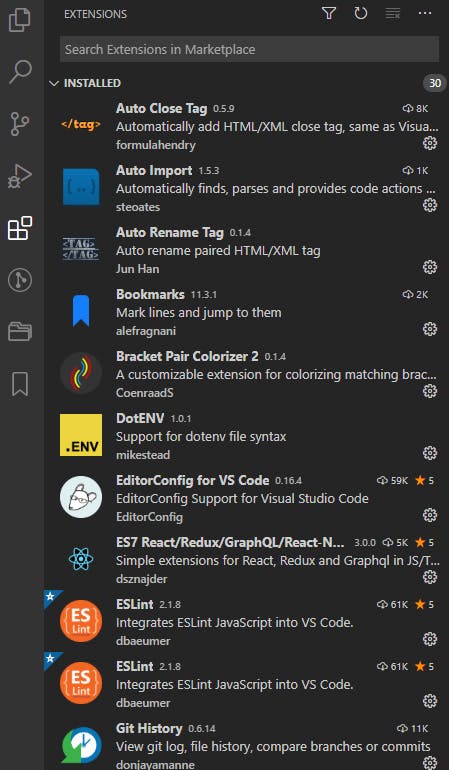
Or use the internal extension sidebar in Visual Studio Code:
Read the official documentation on how to install and manage extensions. Next, I’ll show you two of probably the most commonly used extensions for JavaScript development: Jest and ESLint.
Jest
The Jest extension has the “multi-root ready” support, but it may need some configuration for your monorepo. Install it from within Visual Studio Code. Before you use the extension, you should know a few things:
- Run each package with Jest package installed manually if possible or necessary This conserves your computer resources.
- Disable workspace folders where you do not use Jest This stops (or crashes) the Jest extension in some cases if it tries to find the Jest package multiple times until it stops.
To prevent this strange behaviour, we add some settings to the project.code-workspace file:
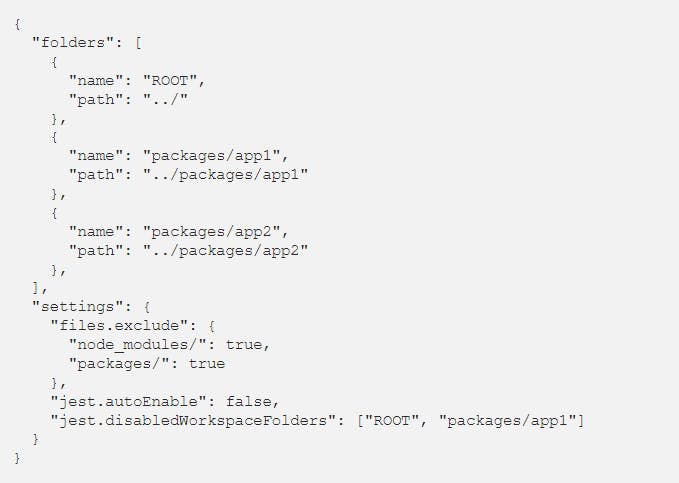
Here we prevent the previously mentioned problems:
- jest.autoEnable: Jest is not executed automatically anywhere in the entire monorepo 2.jest.disabledWorkspaceFolders: Disable Jest when running from the ROOT and app1 folders, based on the folder names
We can now control the start of the extension. One problem with the setting is that you can start the Jest: Start Runner from Visual Studio code on app1 or ROOT even if it is installed there. In my opinion, the combination of jest.autoEnable and the Jest: Start Runner command works well for most cases. You want to run Jest only when needed.
ESLint If you mix different versions in the monorepo packages, then the ESLint Extension will use the correct version and show you linting errors based on its configuration. The best part is that you don’t have to configure anything in the .code-workspace settings file.
Other extensions worth mentioning Here are two other extensions, that I like, that might improve your development workflow as well:
- Monorepo Workspace Does the work with the workspace file in a way other than directly editing the .code-workspace.
- Typescript MonoRepo Import Fixer Useful in a Lerna monorepo.
Visual Studio Code recommendations Here are some recommend extensions for the workspace based on this page. Create an extensions.json file in the root .vscode folder and add the following content:
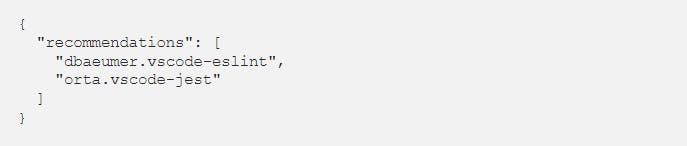
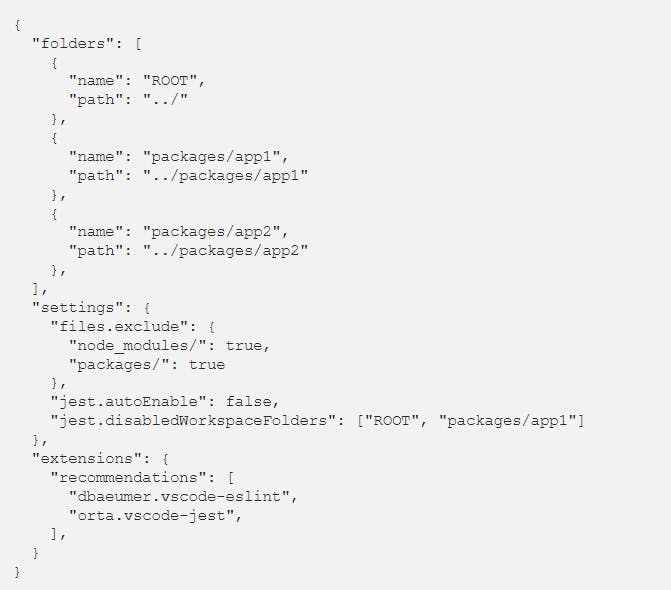
This way, other developers will see a recommendation at the bottom of the extensions’ sidebar view. You could insert it to the .code-workspace file, too:
Now you need to check the extensions sidebar and filter for: @recommended and check the Workplace Recommendations tab:
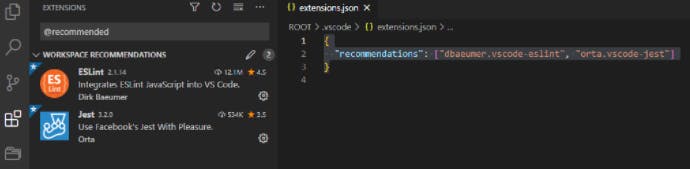
“Fun” notes:
- You can edit the file if you click on the pencil icon
- Visual Studio Code will open/edit the extensions.json file, not the .code-workspace file
Sum it up Developing with Visual Studio Code in a monorepo is (IMHO) pleasant and you can structure the view in explorer easily. This allows you to remove a lot of unnecessary clutter from your eyes and focus on the important parts. The single .code-workspace file is cleanly structured, so it is easy to integrate with other team members to have a template workspace in a project.
Most of the extensions need no configuration for a monorepo project. And if they do, most of the popular extensions have a hint in their documentation or description, so you should know what to do.
Remember, improving your workflow and workspace is also part of a development process.