


How to create Adobe Campaign Standard (ACS) forms in AEM
Written by Navjot Singh Kler


The creation of Adobe Campaign Standard forms in AEM (Adobe Experience Manager) and getting them to work shouldn’t be so difficult, but unfortunately many people find the process tricky. That’s why in the following post I’ve attempted to make your life easier by setting out steps on how to enable, configure and create ACS forms in AEM and use them to create a profile in ACS.
Why do you need the Adobe Experience Manager?
As mentioned on Adobe’s Experience Cloud Documentation page : “AEM lets you create and use forms that interact with Adobe Campaign on your website.” Below, I’ve consolidated all the steps that I learnt from my own experiences and on various community forums (like this) which have helped me in some ways, but never offered a complete overview. Steps in this guide are what worked best for me, and I hope it helps you too!
A step-by-step guide to creating an Adobe Campaign Standard form in AEM
I’ll be modifying an existing We.Retail project to showcase how to get it working. I’m pretty sure that if you follow the same set of steps in your own project (or just in We.Retail to see if really works!), you’ll be able to get things up and running in no time. In these steps, I will make some modifications to the existing templates and set some default properties in them, as well as create a clientlib, along with the obvious Adobe Campaign cloud configuration, in order to be able to create a profile in Adobe Campaign Standard using the form.
So let’s begin!
1. Modify “page component/structure component” — whichever way you call it!
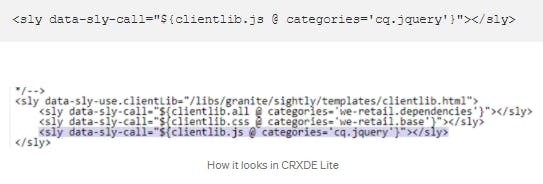
1.1 Include jQuery JS in your website’s head tag. You can skip this if you already have it loading in your application. This change is usually supposed to be done in customheaderlibs.html
Example: Path: /apps/weretail/components/structure/page/customheaderlibs.html Code:
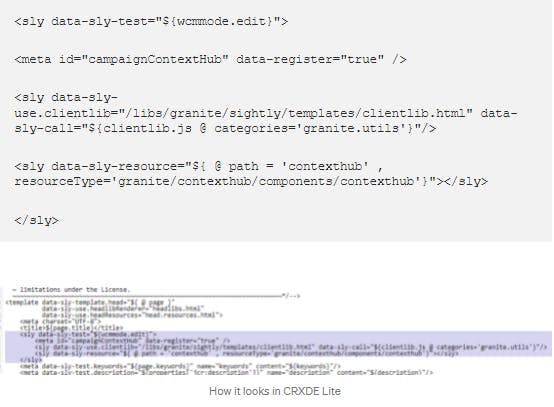
1.2 Include context hub and granite utils.
You can include the following snippet in head.html (usually the place where you have head tag). This step makes sure that context hub loads properly on your website, which is required for the Campaign Component’s mapping capabilities (will be used in step 6.6 ) to work. Without line 3 & 4 (in code snippet) below, you will get “CUI is not defined”, “Cannot read property ‘externalize’ of undefined” and “window.injectCentextHubUI is not a function” errors in browser console.
NOTE: Just for the sake of example, I am adding this change in the mentioned file path as it’s not overridden in We.Retail. You should not directly make this change in this path and I don’t recommend it. Instead, override it in your project if that has not already been done.
Example: Path:/apps/core/wcm/components/page/v2/page/head.html Code:
2. The “proxy” page component.
Your project’s page component should point to this page component (The one we will create now). It seems AEM uses this specific path name internally to enable ACS integration. This proxy page component should point back to the core page component used in your project. In case of We.Retail, the page component points to /apps/core/wcm/components/page/v2/page and now we make the proxy page component point to this.
2.1 Creation of proxy page component. NOTE: Usage of exact same name is important.
Example:
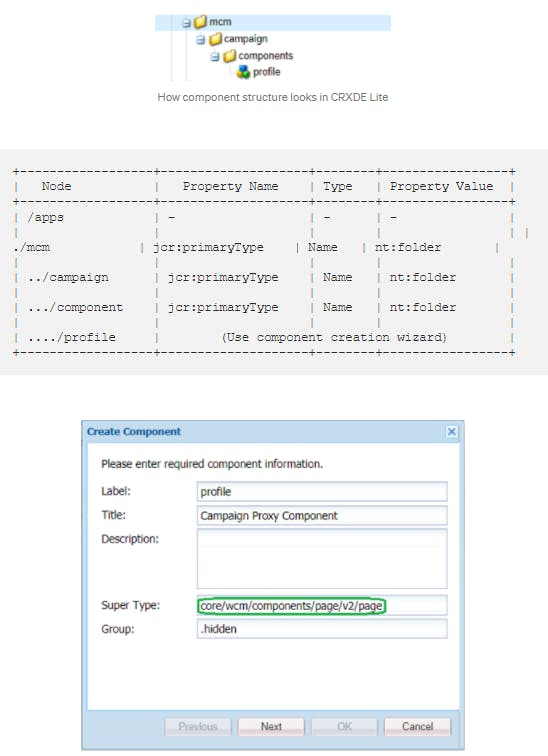
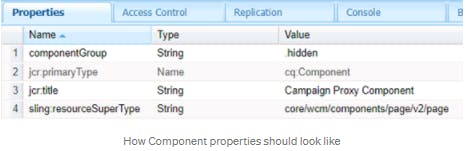
The highlighted “Super Type” text should point to your project’s root page component. The one in the screenshot is valid for We.Retail. NOTE: Make sure to delete the profile.jsp file that gets created using this wizard as we don’t need it. Otherwise you will see a blank page when you open a page referring to this page component.
2.2 Point the page component that you want to use, to the above created proxy component at the path: /apps/mcm/campaign/components/profile
Example: In case of We.Retail, I have changed the /apps/weretail/components/structure/page node’s sling:resourceSuperType to mcm/campaign/components/profile
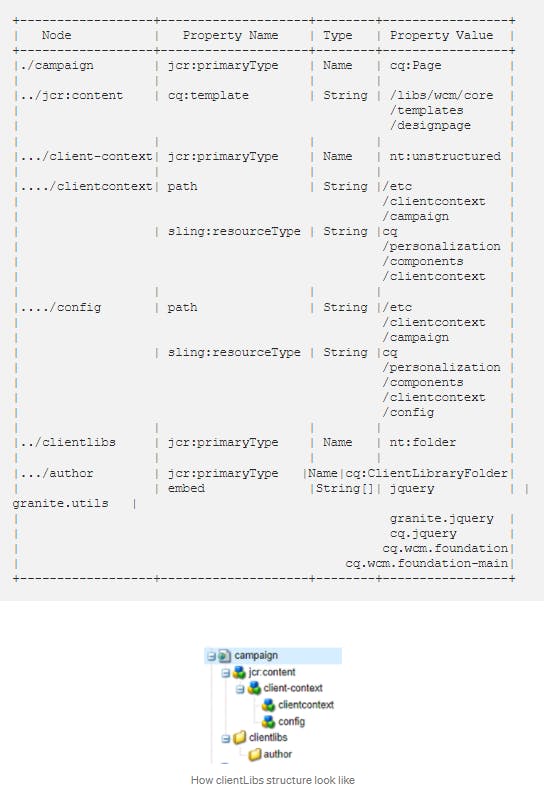
3. [OPTIONAL] Create “clientLibs”
NOTE: This step is required in older versions of AEM and if you see context hub is not loading or the mentioned categories of clientlibs are not loading. Create clientlibs with the properties mentioned below. In the case of older AEM versions it can be under etc/designs, but in the case of newer AEM versions, you can use /apps/settings/wcm/designs.
4. The Template
Create a template using the page component modified above(in steps 1 and 2). I won’t explain how to create it here as the Adobe Experience Cloud Documentation can be referred to for this. I will use the already existing template at the /conf/we-retail/settings/wcm/templates/hero-page path.
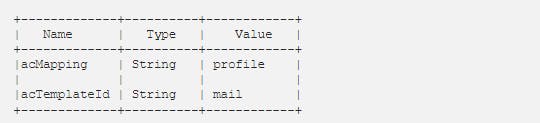
4.1 Embedding required static properties in template The following properties need to be added manually into the initial configuration of the template that you created or already have. As I am using We.Retail, I will navigate to /conf/we-retail/settings/wcm/templates/hero-page/initial/jcr:content . In your case, you must navigate to a similar initial node of your project template and add the following properties to it:
The same should be added into your specific template-type’s “initial” node as well. For this example it’s not necessary, so I’ll skip it here.
4.2 [OPTIONAL] Adding Initial Page properties Open the Template (by going to Tools -> Templates -> We.Retail -> Hero Page), select “Initial Content” from the top right-hand corner and then choose “Initial Page Properties”. In there, select “Advanced” and choose the clientlib created above in step 3 for the “Design” field and click “Save & Close”. In our case it would be something like /apps/campaign in the path picker and will look like /apps/settings/wcm/designs/campaign, once it is selected, in the “Design” field. Make sure that you choose one level before the “clientlibs” folder in the path picker and the final path should not contain “clientlibs” at the end.
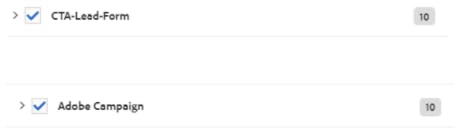
4.3 Adding required components to our template’s allowed components list Now again using the template page opened above, from the top right-hand corner, select “Structure”. On this page, we can choose which components are allowed. For our example, we need the ones from “Adobe Campaign” and “CTA-Lead-Form”
5. The Cloud config
Now we’re all done with our “code” changes and configurations, the last step to configure would be to create an Adobe Campaign Standard cloud configuration.
5.1 Navigate to Tools -> Cloud Services -> Legacy Cloud Services. On this page, scroll down to Adobe Campaign and click on “Configure now” to add the new configuration. After filling in “Title” and choosing the only available template i.e. “Adobe Campaign configuration” in the “Create Configuration” dialog, the following dialog will appear:
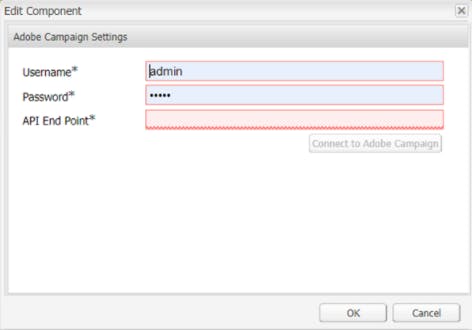
5.2 “Username” is usually “aemserver” and “API End Point” is the URL that you use to access Adobe Campaign Standard, ending with campaign.adobe.com. For a password, you need to contact Adobe Customer support. Only Adobe can create this user and share its password. Once you fill in the details and click on “Connect to Adobe Campaign” and if all details are correct, you should get:
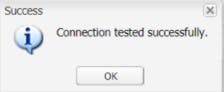
If you don’t receive this notification, then either the information entered is incorrect or you need to whitelist your IP address, from your AEM or ACS instance or both.
6. The FORM!
Now we are ready to create a page using the template created in Step 4 and cloud config created above, to create a page in We.Retail, add form fields to it, bind those form fields to ACS Profile schema and submit this small form to create a Profile in ACS.
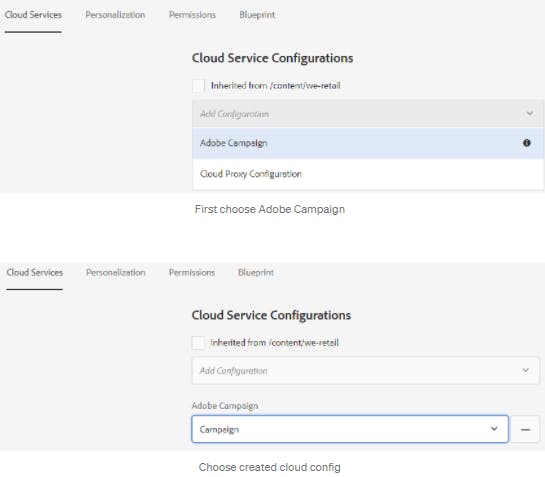
6.1 Create a page using the template that we have created or modified above. I will be using Hero Template as that’s what I have modified above: Navigate to /content/we-retail/language-masters/en on “Sites” page, click on “Create”, then “Page”, choose the template and enter required details. In my case, I only fill in the “Title” field 6.2 Open the page, click on “Open Page Properties”, navigate to “Cloud Services” and choose the cloud config created above in step 5 above and click on “Save and Close”.
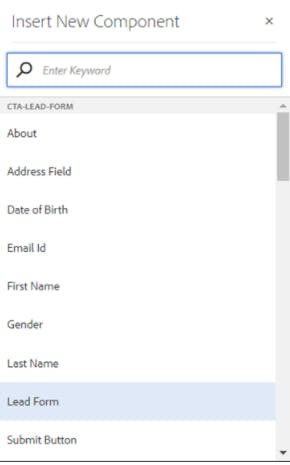
6.3 Now on the empty “parsys” on the page, first add “Lead Form” component from “CTA-LEAD-FORM” component group.
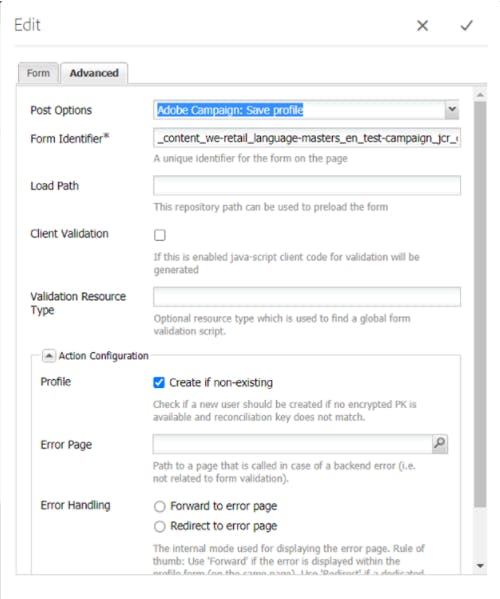
6.4 Edit the “Form Start” placeholder

I would skip to the “Advanced” tab and fill in only the required details — “Post Options”, where I choose “Adobe Campaign: Save Profile” and select “Profile — Create if non-existing” under “Action Configuration”
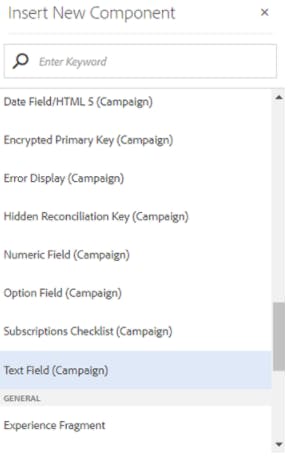
6.5 Now click the “Form End” placeholder, and click “+” to start adding form fields:

I then choose the “Text Field (Campaign)” component from the “Adobe Campaign” component group
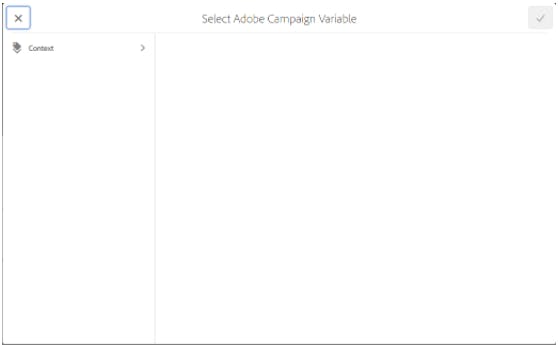
6.6 Now edit the component added above and enter details like “Title” and “Name” for which I will add “First Name” and “firstName” respectively and then we move to the next tab that says “Adobe Campaign”. And now comes the moment of truth to see if we are actually able to view actual Profile Schema fields fetched from Adobe Campaign Standard! When I click on the Adobe Campaign logo next to the “Mapping” input field,

I can see the following dialog:
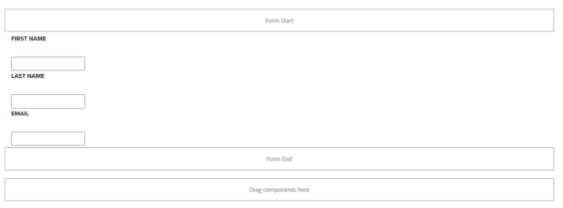
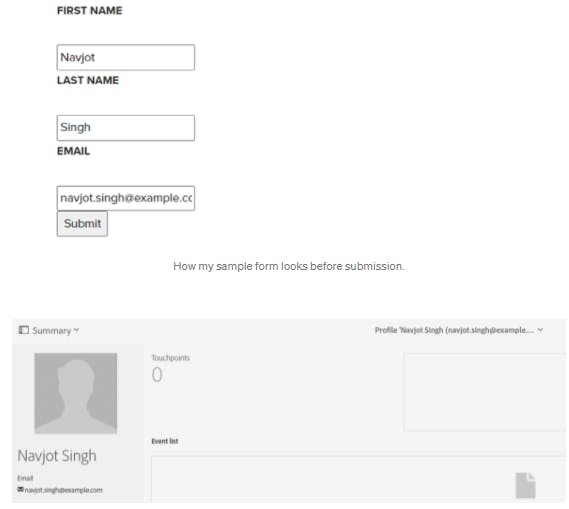
6.7 We repeat steps 6.5 and 6.5 to add “Last Name” and “Email address” to the form too, and my form will now look like:
6.8 Now we add the “Submit” button on the form. For this, we will click on “Form End” placeholder again and now click on “Configure”

And the following dialog will appear:
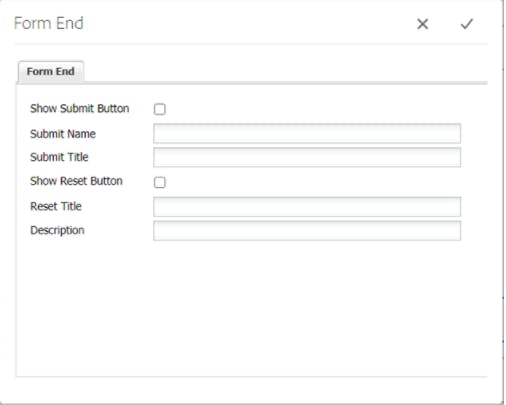
Here we can do just necessary configuration like enable “Show Submit Button” and add “Submit Title”. Now view the page in publish mode, fill in the required details and submit the form. It should just refresh the page, and if you check in Adobe Campaign Standard for the latest profile, you should be able to see a new profile with submitted information.
Conclusion
So you’ve now seen the changes and configurations that need to be done for the form component in AEM so that it’s able to submit information to Adobe Campaign Standard. Now it’s up to you to explore this form’s other capabilities and how to use it. I personally always extend the Adobe Campaign components and modify the dialogs and html to my own needs. However, for me, the most important feature is the binding capability - to bind the form fields to the Adobe Campaign Standard Profile Schema fields. Using this feature with my own form submission logic using ACS API offers a great set of possibilities for me to work with AEM and Adobe Campaign Standard.